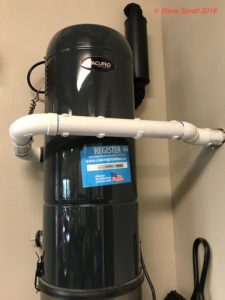
Your central vacuum is not just a major appliance, it’s also a massive pipe system. Only the central power unit of this system is visible. The main piping lays hidden. A central vacuum system may have hundreds of feet of plastic pipe meandering through your walls, attic, crawlspace, basement, and soffits.
Keeping it clean
Central vacuums are really handy. If you have one, it’s likely to be put into service frequently, and will often be used to suck up rather filthy debris. In time, this process will build-up a layer of dirt on the insides of the pipes and leave the entire system smelling, well, dirty.
The solution
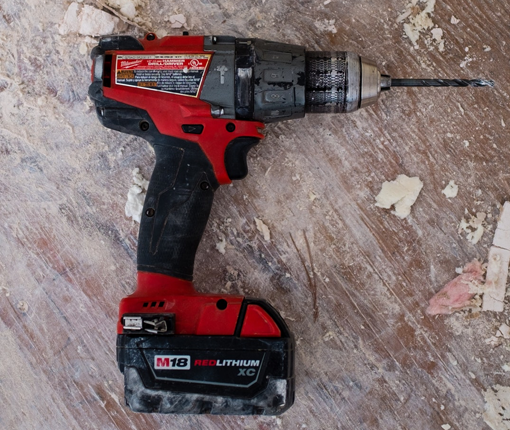
Central vacuum cleaning sheets. When suctioned through the hose, these treated sheets rub on the inside of the piping. This action cleans the pipe walls as the sheets travel through the system to the main vacuum unit. Along the way, the sheets will often collide with stuck objects in the tubes. Crayons, nerf balls, batteries, model cars, dried candy, hair-balls, cocoa puffs, and just about anything else will get pushed along by the moving sheets and end up in the main vacuum canister.
How it works
Central Vacuum Piping
This reason this works is because vacuum cleaning sheets are designed with the perfect balance of size, density and moisture to create suction pressure. The pressure causes the sheets to adhere and scrub on the interior walls of the pipe. As the sheets travel through the pipes they wipe and clean the surfaces.
If the system is old you may want to repeat the process several times. Run sheets through from all the various ports starting with the closest and moving outward to the others.
The powerfully pleasant scent leaves the entire system smelling clean and fresh. Even the exhaust air exiting the main unit is fresher because after passing through the system, the cleaning sheets simply remain in the bin till emptied. I did not find a scent-free version but you may be able to achieve similar results by using unscented dryer sheets for the same purpose.
Can cleaning sheets clog your pipes?
If your system has experienced a tough clog, this product should push it all through. Unfortunately there is a chance it could get stopped up even more. That may turn out to be a good thing as sometimes clogging the pipe can actually help the vacuum build enough pressure to force the mess through.
If not, then the clog was certain to be a problem anyway because something is stuck fast in the piping or hose. If you have something stuck like this, you may need to have your contractor come out and free up the problem. Once the problem is cleared you will be able to use the service sheets again with no issues.
Summary
Cleaning sheets are easy to use if you follow the directions. Simply vacuum a cleaning sheet through the hose at each wall port. Repeat the process after each use thereafter. The product comes in a container with 25 sheets so you may want to get several containers. The result is a cleaner, fresher-smelling system with stronger, uninterrupted air flow. Plus a happier homeowner! I can attest to that…and you can get them here.
Where is all my heat going? And what is that smell??How many problems can you spot? Let me know??
Beware… an invisible, unhealthy area of your home may be making you sick.
Where is the nastiest place in your home? Behind the refrigerator? Under the washing machine? Around the toilet? Nope. The nastiest place in your home is a place you may not even be aware of… and it’s right under your feet.
If you want a good a scare, check your crawlspace.
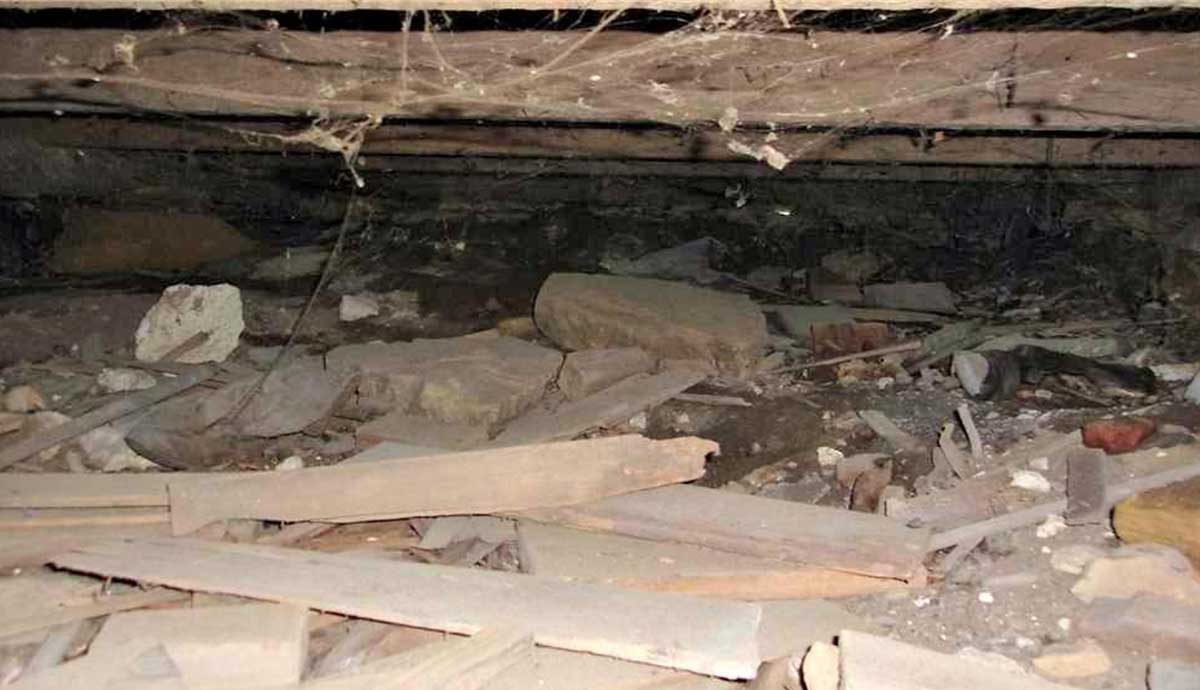
Under your floor is the crawlspace, an area rife with dust, disease and crawly creatures. Some are alive… and some not so much. This small dark world may be out of sight, but its toxic environment permeates your every breath, and affects the health of the entire structure…even in the most beautiful and expensive homes. the crawlspace is truly the filthiest place in your home.
What’s a crawlspace
Crawlspaces are shallow, uninhabitable areas located between the soil and the first floor of the home. They are typically excavated below grade and are meant to provide ventilation and access to the foundation, framing, and utility systems running below the floor. This area is avoided by everyone except brave plumbers and termite inspectors and who can blame them? These areas are dark, barely accessible and dangerous. They are also the filthiest place in your home.
Out of sight, out of mind
After just a few years of neglect, crawl areas can become universally unhealthy and dangerous places for humans. Even for pros equipped with protective gear, descending into a crawlspace abyss is no picnic. Inspectors daring to go into the crawlspace, are regularly confronted with abandoned construction debris, mold, termites, spiders, wood rot, plumbing leaks, mud, standing water, raw sewage, sharp nails, empty beer cans, reptiles and both living and deceased rodents. One large luxury home HPS worked on had 37 rodent carcasses under the home. That must have been nice to live with.
Dreadful air quality makes for the nastiest place in your home
Homeowners would be absolutely appalled if they could see the conditions just inches under their feet. Here’s the really bad part. Even though you don’t see it, the crawlspace is affecting you. The reason for this is that air from the crawlspace permeates into your home and mixes with the air you breathe. It gets in through leaky heating ducts, around oversized holes cut for plumbing and electrical lines and through minute cracks or other openings in the subfloor.
Water in the crawlspace
How to dress for a crawlspace visit
The dirt floor of the crawlspace is below grade, so any drainage issues from outside will allow water to find its way in. Moisture in your crawlspace means a big “F” on your home’s drainage report card. You may have a problem with overflowing gutters, disconnected downspouts, poorly sloped splash blocks, bad perimeter grades, failed perimeter foundation drains, broken water lines or all of the above. You may also have a home that was built over a spring or is subject to runoff water from neighbors.
In really serious cases, crawlspaces can have several inches of standing water collected in them. Any water in the crawlspace can cause mold, mildew and elevated humidity problems in the house. All of these problems contribute to poor air quality. Moist soil and standing water will also soften the foundation footings and allow settlement and eventual foundation damage to occur.
A wet crawlspace screams that something is wrong, so the first thing you should do is figure it out and fix it. You may need some professional help with tracking this down. Learn more about perimeter drainage systems and how they work by visiting my foundation and drain pages. Eliminating moisture makes crawlspace clean-up and repair much easier.
Fight back
The good news is that bad crawlspaces can be fixed. A bit of clean-up and the repair of broken ducts and drainage problems will make a huge difference. There are professionals out there who will even do this for you. Because the work is dirty, dangerous and must be done in dark, cramped conditions it is not inexpensive. Call and get several proposals.
If you are brave, you might consider doing the clean up job yourself. It won’t be easy or fun but it will be worth the effort.
Here’s a plan:
Keep safety in mind first. Wear protective gear and make sure you arrange good lighting and fresh air. Make sure the access hole is large enough to get in and out safely. If you are claustrophobic, let someone else do this work. Crawl the entire area making observations and taking. Photos will shorten your time under the home and allow you to review them at length later so that you can make a plan of attack.
Once you have created a strategy of attack, you can get on with cleaning up the filthiest place in your home.
A relatively clean crawlspace (uninsulated) w/no liner
The filthiest place in your home clean up checklist
Bring in fans to dry out any moisture and provide fresh air.
Repair or replace any damaged ducting and strap it properly up to the floor joists.
If insulation is in place, check around the plumbing and ducts to see if there are any openings through the subfloor.
Secure and reinstall any loose insulation.
If there are hanging wires, have an electrician check them out, make them safe and secure them to the framing.
Have a plumber check out the system and to secure any loose plumbing and water lines.
Seal any and all holes in the subfloor. The idea is to stop air migration between the crawlspace and the living area. Areas that typically have problems are bathtubs, heat ducts, air vents, wire and pipe penetrations.
Close any holes in screens or other perimeter openings that might allow rodents to enter. Check the foundation vents and be sure they are sufficient to meet the ventilation code.
Crawlspace after clean up and liner
Summary
If your home stinks or smells musty all the time, something is likely wrong in the the crawlspace, the filthiest place in your home. Have a professional check it out and take photos. Most termite companies will do this for you. Don’t hesitate to clean up any messes found in your crawlspace. With a little work you can turn the nastiest place in your home into a surprisingly clean area that will help breath some fresh air into your life.
Door locks-hardware have actually been around for quite a long time. Some person with something very precious to protect came up with a basic wooden pin-lock mechanism around 6000 years ago in Mesopotamia. That lock was opened with a wooden key. What’s surprising is the mechanics haven’t really changed much in all that time. Most homes today still use a pin-lock cylinder mechanism just like that only in metal. Ours open with a metal key. If you are like most homeowners, you probably have a key for your front door.
This may sound silly, but even stainless steel needs love. Well, maybe not. But if you can’t give it love… at least you might want to give it care.
Stainless steel BBQ
What is stainless steel
Stainless steel is a truly wonderful material and it is surprisingly new to the industrial world. It’s made from a very precise alloy of iron, nickel, chromium and carbon. The term alloy refers to metals made with blends of various elements such as this. What makes this steel alloy so special is its resistance to corrosion. Corrosion resistance comes from a chromium content of at least 10.5%, mixed with small amounts of molybdenum. Apparently, rust doesn’t like that mix.
Steel’s resistance to corrosion and pitting increases with higher amounts of chromium and molybdenum. Unfortunately, there are limits and some drawbacks to going too far with this. Increasing the amounts of chromium and moly too much can weaken and increase the brittleness of the metal. This means that there is no single magic bullet, or “best” alloy when it comes to stainless steel. The result is a multitude of special stainless grades. All these come with infinitely varying chromium and molybdenum ratios to address the many applications and environments they must operate in. Choosing, or even creating the right grade of stainless steel for the job is an important and exacting metallurgical science.
In the beginning
In 1913 Harry Brearley led a team of scientists in Sheffield, England to develop the first stainless metal alloy. Since then, more than 250 stainless steel grades have been created to meet various needs. Of all those grades, there are five basic types: Ferritic, Austenitic, Martensitic, Duplex and Precipitation steel.
The most exotic stainless
There is a sixth and fairly exotic family of stainless called Superalloys. As a homeowner, you can basically ignore these. Superalloys are much stronger and more durable than the others. They are also hard to make, very rare and thus come with extremely high prices. Space exploration, nuclear weapons and submarines apparently all need superalloys. I’m sure our military loves the stuff. However, homeowners needn’t care about it unless you are planning to build a DIY nuclear accelerator in the back yard.
The homeowner’s guide to common stainless grades
Here are the main grades of stainless steel that homeowners should know about:
304
This is a common grade of stainless steel that you see every day. 304 contains a minimum of 18% chromium and 8% nickel. It is ferrous (magnetic) and used in the manufacture of many mass market household appliances like refrigerator skins, BBQs and even the bodies of the Delorean automobile.
316
This is a slightly higher quality “marine” grade. 316 contains 16% chromium, 10% nickel and 2% molybdenum. Molybdenum helps resist corrosion from chloride (salt). Metal parts exposed to the ocean or other salt environments are perfect for 316 material. 316 stainless makes great food machinery, precision tools, surgical instruments and even jewelry. It is commonly built into boats and extremely durable outdoor rated appliances. The most durable BBQ’s are made with this type of stainless steel. See how to buy a BBQ.
Stainless steel brewing chamber
409
This material is not attractive and does not polish well. 409 stainless is the material of choice for engine exhaust systems. It is also used in applications where corrosion resistance is desired and aesthetics are secondary.
420
420 stainless has a higher carbon content than some and is thus stronger and harder. Flatware, cutlery, surgical and dental instruments, scissors, tapes and straight edges are all made from 420 stainless steel.
430
430 is not very hard or hardenable, but it has good aesthetics, corrosion resistance and formability. It is one of the few stainless materials that can be easily rolled into flat sheets and formed into shapes. Dishwasher interiors, chimney liners, wire lashings, auto trim and other decorative products are all made from 430 stainless steel.
440
Known as razor steel, 440 is a very hard and high grade stainless used for fine cutlery, knives and razor blades. 440 can be sharpened without losing its hardness, and is unaffected by food, acids and other corrosive materials. These characteristics make for long wearing, durable sharpness which is ideal for cutting edges.
904L
This is an extremely high quality, non-ferrous stainless steel. It has a bright, beautiful appearance combined with good machining properties. It is used for the manufacture of one the most sought-after wristwatches in the world, the Rolex Stainless Steel Daytona. Critical parts for top-secret US military machinery and submarines are made from 904 L stainless. Unfortunately I can’t tell you about those.
Rolex Stainless Steel Daytona
General care
When first manufactured stainless steel is ultra tough, but contamination can adversely affect its surface during later fabrication. Debris, dirt residue like free iron, grease and machining oils can all collect on the surface. These are usually microscopic and can go unseen to the human eye. These pollutants weaken the metals resistance to surface corrosion and make it more susceptible to degradation. This microscopic contamination can allow stainless steel to corrode and explains why some low-cost products will develop “rust spotting”.
Passivation
A process called “passivation” or pickling can return some corroded stainless steel surfaces back to original specifications. Passivation aggressively removes the contaminants from the surface and neutralizes any unwanted electrical charges. It then washes the material in a protective bath, and coats it with a sealer. The process is labor intensive, but it purifies and protects the surface of the stainless steel and allows the metal to protect itself. Years ago I developed a good formula for the passivation of high-quality outdoor stainless steel railings and other materials. We use it at HPS frequently for our clients with homes exposed to marine environments. If you are interested in the “pickling” process, the recipe for it can be found here.
Polishing stainless steel
Cleaning
Do not scrub stainless steel with an abrasive. Appliances with stainless steel have a very uniform, machine applied finish. It is surprisingly easy to scratch. Any use of an abrasive will mess up the machine marks and permanently ruin the finish. Simply clean stainless steel with mild detergent, water and a soft cloth.
Also, never, ever use steel wool to clean stainless material. Its abrasiveness will ruin the machine finish and also embed microscopic particles of iron onto the surface. These particles will begin rusting almost immediately and destroy the finish. As tough as stainless steel is, the cosmetics are delicate. If you scratch or mar the surface, you may have to replace the part. Refrigerator and dishwasher fronts are often the victims of damage thanks to kids or overzealous housekeepers. It is possible to replace the damaged front “skins” on some of these appliances, but it can be expensive. Perhaps it would be better to just place a magnetic reminder over the damage. It should say “Don’t scratch me!”
Most of the U.S. is broiling under a heat wave at the moment. From the Midwest to the East Coast a sweltering parade of 100-degree days seems to be marching across the country without end. Severe weather is the norm these days, and when times are hot like they are right now, it’s nice to have a cool home to retreat into. But if the interior of your house is roasting too, you’ll be glad to learn there are some hacks that can help with cooling it down. Let’s start with cooling down your attic.
What is an attic?
An attic is an uninhabitable space in your home that lies directly below your roof and above the ceiling framing of the top floor. On homes with tall, steep-pitched roofs, the attic spaces can be very large and voluminous. Homes with low pitched roofs will have very small and cramped attics.
Attics spaces are there to provide access to these areas for inspection, maintenance and service. Building codes require access to attic spaces but deem them uninhabitable because they lack things like insulation, floors, escape windows, climate control, fire resistance and other basic elements needed for safe human occupancy.
Conditions
A clean, empty attic space
Since attic spaces are not inhabitable, they are usually left rough and unfinished. Attics spaces contain exposed framing, insulation, roof nails, electrical wiring, plumbing pipes, and heating ducts. On rare occasions a conscientious builder might have installed a bare bulb work light and some planking to traverse across the ceiling joists safely. That’s about it for attic amenities.
Attics are required by code to be passively ventilated to the outdoors, meaning outside air is encouraged to flow through the attic freely. If properly designed, fresh air will move in through screened openings around the eaves at the perimeter, then out at the upper areas of the roof through the natural movement of convection. Convection basically means hot air rises.
Since air flows freely through the attic, pollens, dust, smoke and any other pollutants in the air migrate in as well and accumulate onto the interior surfaces. Any insects and animals able to find their way through the screened eave vents or any openings in the siding will also take up residence there. Because of all this, an attic space is a place most people prefer to avoid.
Heat generation
Under ideal conditions and with perfect ventilation, air would naturally flow through the attic at a pace that would keep the space very close to the same temperature as the outside air. This would be similar to how your house would feel if you kept the windows and doors open all the time. On hot days the rooms would be hot and on cold days the rooms would be cold.
In reality the attic space is much different than rooms in your home.
Inside your home, the outside walls and ceilings of the rooms are insulated, and the wood framing is covered with drywall. In the attic there is no insulation from the exterior (roof) and no drywall on the framing. This allows much more heat gain in the attic as compared to the interior of your home. The reason is that heat is transferred into the attic from the sun as well as from the temperature of the outside air.
Radiant heat from the sun
It works like this. The attic starts out the day with a volume of air that is about the same temperature as the outside air. As the day progresses, sunlight radiates down on the home heating up the surface of the roof. As the roof surface temperature rises, this heat transfers (conducts) down through the sheathing and rafter framing.
Thermodynamics and heat gain
Now the roof structural members and sheathing in the attic space are hot and they begin to transfer heat to their surroundings. They do this in a couple of ways. 1) heat radiates from the roof framing down through the attic and heats up anything it comes in contact with including stored boxes, the ceiling framing, furnace ducts, wiring, ceiling insulation, dust, dead rodents, etc. 2) All the hot items in the attic (framing, sheathing, toys, boxes, insulation, dust etc.) now begin to conduct (or transfer) heat to the surrounding air molecules that come in contact with it. This all happens fairly quickly.
The process described above produces heated air much faster than it can be exchanged through ventilation. The result is an extremely hot attic.
The sun’s radiant heat is the engine for all this, and the process continues as long as the sun is shining on the structure. Even after the sun goes down, the hot items in the attic will continue to radiate and conduct heat keeping the air inside warm long after the outside temperature has cooled down.
Convection
Once the air in the attic has become hot, another thermodynamic process called convection occurs. Convection is the characteristic that makes hot air rise and cool air sink ,and it is at this point where a good ventilation system comes into play. As the air inside the attic becomes hot, it will rise to the highest point in the roof and escape through any vents placed there for that purpose. (Continuous ridge vents are good for allowing hot air to escape at the place it collects.) As the hot air escapes out the top, cool air will be sucked in at the lower eave level to replace it.
Unfortunately, radiant heat causes the temperature of the attic to rise faster than the air can be exchanged through passive ventilation (convection). Large mechanical fans aiding the ventilation process may help some (by moving the hottest air out faster), but that will not prevent the radiant process from continuing to elevate the temperature of the entire attic structure and all its contents. In other words, faster air exchange (convection) may reduce the temperature of the attic air, but that will do little or nothing to cool the structural elements and contents because they are continually being heated by the radiant process.
So what’s wrong with a hot attic?
A hot attic it makes for a hotter house. This results in higher cooling bills and the need for thicker insulation above the ceiling. Another problem is any ducting in the attic will be heated and the heat will transfer into any the duct and warm any cool air moving through it and into the home. Also, any equipment in the hot attic will have to work harder to do its job and thus the life will be shortened. No heat sensitive items can be stored in a hot attic. You will be tempted to purchase an attic fan.
So how can you make a cooler attic?
Step one: Ventilation
Thanks to the radiant heat affect, attic temperatures on a 100-degree day can reach 170 degrees or more. That is certainly too hot, but how hot is OK? At the very best, conventionally ventilated attics can never be cooler than the outside air temperature. This is because the attic is essentially open to the outside air. If the air outside is 100 degrees in the shade, your attic cannot ever be cooler than that. But even 100 degrees in your attic would be much better than 155, so how can we move the temperature in that direction?
Passive venting
The easiest way to start is to maximize the passive ventilation in your attic. Make sure you have the most ventilation your home can handle. Code requires 1 square foot of vent opening to 150 square feet of attic space. I personally don’t feel that is near enough because the total volume of air that needs to be exchanged can vary quite a bit with the pitch of the roof. In addition, locating the vents is just as important. You will need as much square footage of vent at the apex of the roof as at the perimeter eaves. Put in as much as you can.
Mechanical fans
Attic fan
If you plan to use an attic fan to exhaust hot air out of the attic, make sure you have enough incoming air vents around the perimeter to accommodate the extra flow. Otherwise you can create negative pressure in the attic that will suck expensive conditioned air out of your living area.
Good ventilation improves the convection process. It helps to move some of the overheated attic air out and replace it with fresh “outside” temperature air. But this is not enough. Now we have to deal with the cause of the heat gain.
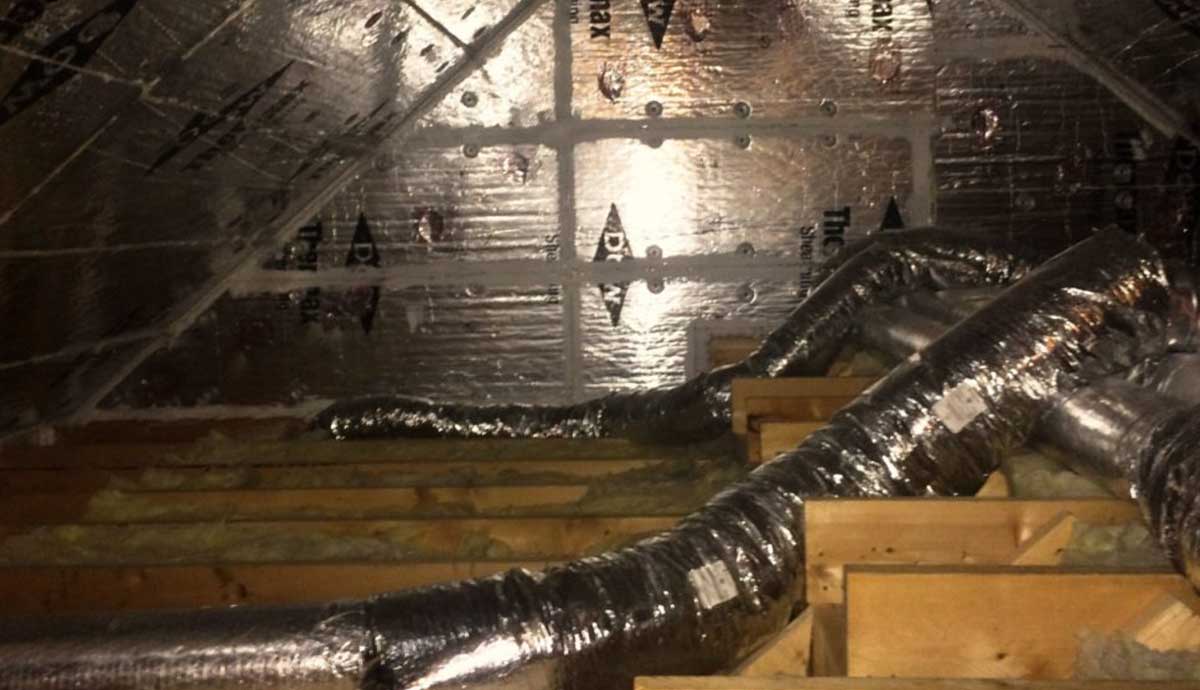
Step two: Radiant barriers
Once you have mastered the ventilation problem, the next step is to install radiant heat barriers. These barriers will help to reduce the heat gain created by the sun and prevent it from radiating from the roof throughout your attic. Radiant barriers are very effective in hot climates and especially effective when heating/cooling air ducts are located in the attic. Studies have shown these barriers will reduce a/c cooling costs 5% to 10% in hot, sunny climates. The reduced heat gain may even allow for a smaller air conditioning system.
Installation
Installation is fairly easy when building a new home. Simply drape the barrier between the roof rafters. Placing the material just under the sheathing will minimize dust accumulation on the reflective faces. Retrofitting barriers later can be more difficult. Space is tight when working in the attic and there will likely be framing, braces, wiring, plumbing ducts and other obstructions to work around.
It’s important to allow an inch or so of air space clearance between the attachment points and the bottom of the roof. The radiant foil will heat up, and the air space will allow the heat to migrate up and ventilate out. A couple of safety notes: Radiant foil will conduct electricity, so avoid making contact with bare electrical wiring. The foil may also interfere with cell phone reception. Please refer to the reflective insulation trade association as they offer other information and excellent installation tips.
Radiant barriers create invisible shade
What the reflective barriers do is halt the heat from the roof area from radiating down to the other interior areas and contents of the attic. The heat stops at the upper reaches of the roof framing. The barriers shield the area below that would normally themselves become heat sources (ceiling joists, cross braces, equipment, boxes with Christmas decorations and ducting etc.) that would then conduct heat to the air and make the attic hot.
Attic radiant heat barriers installed
As discussed above, these solutions work. Radiant barriers will immediately reduce temperatures in your attic. The improvements will be significant, perhaps 20-25% lower than temperatures prior, but as mentioned earlier the temperature in your attic using these methods will never be lower than the outside air temperature. If the outside temperature is 110 degrees in the shade, your attic will always be hotter than that.
A very hot 170 degree attic
A conditioned-space attic…the ultimate solution
If you want a truly cool attic, you can convert it to conditioned space. I have used this option personally several times and highly recommend it. It requires some work and has a cost but it is worth it. A conditioned-space attic will keep the entire home cooler in summer, warmer in winter, while prolonging the life of any attic mounted equipment, and improving air quality in the home.
Creating a conditioned space attic means sealing up all eave/roof ventilation openings, removing the insulation between the ceiling/attic space then adding foam insulation to the underside of the entire roof system down to the wall plates. This turns your roof and attic into a kind of thermos and the air in the attic area becomes (conditioned) the same temperature as the interior of the home. This idea is not new but some building departments are not yet aware. Check the building codes in your area.
The key to a successful conditioned-space attic is to heavily insulate the roof diaphragm and completely seal it. Any air allowed to migrate will eventually find a cold place on which to condense and cause mold/dryrot. This sounds simple enough, but the frame of a highly complex roof has many places that might allow air to pass through.
High-tech foam
The solution that makes the conditioned space attic possible is spray foam insulation. Foam insulation is a chemical product created by mixing isocyanate and polyol resin. When these chemicals come together they form millions of tiny air bubbles and quickly expand up to 60x. The bubbles in the foam create extremely high insulation qualities per inch and the finished solution blocks the three primary forms of heat transfer, including radiant heat. Simultaneously it fills and seals any voids in and around the framing and allows no air/moisture filtration. This is a perfect storm solution for roof applications.
Spray foam insulation
On my projects, I like to use a closed-cell foam product blown on by hydrofluoroolefin (HFO) to avoid any environmental or global warming impacts. Closed cellfoam provides a higher R-value per inch and is completely air/moisture tight.
With a conditioned-space attic there are no vents to the outside air. The removal of screened vent openings eliminates the infiltration of dust, smoke, pollens, insects, rodents and birds as well as heat and cold. Eliminating dirty air migration from the attic greatly improves air quality in the home.
Summary
Designing a cool attic can be tricky and requires a basic understanding of thermodynamics and how air and moisture migrate through a home. The combination of sufficient ventilation and the ability to control radiant heat gain are keys to success. Before you go out and spend money on fans or barriers take time to study your roof and attic to come up with a reasonable plan. Using this guide will help you have a cooler summer.
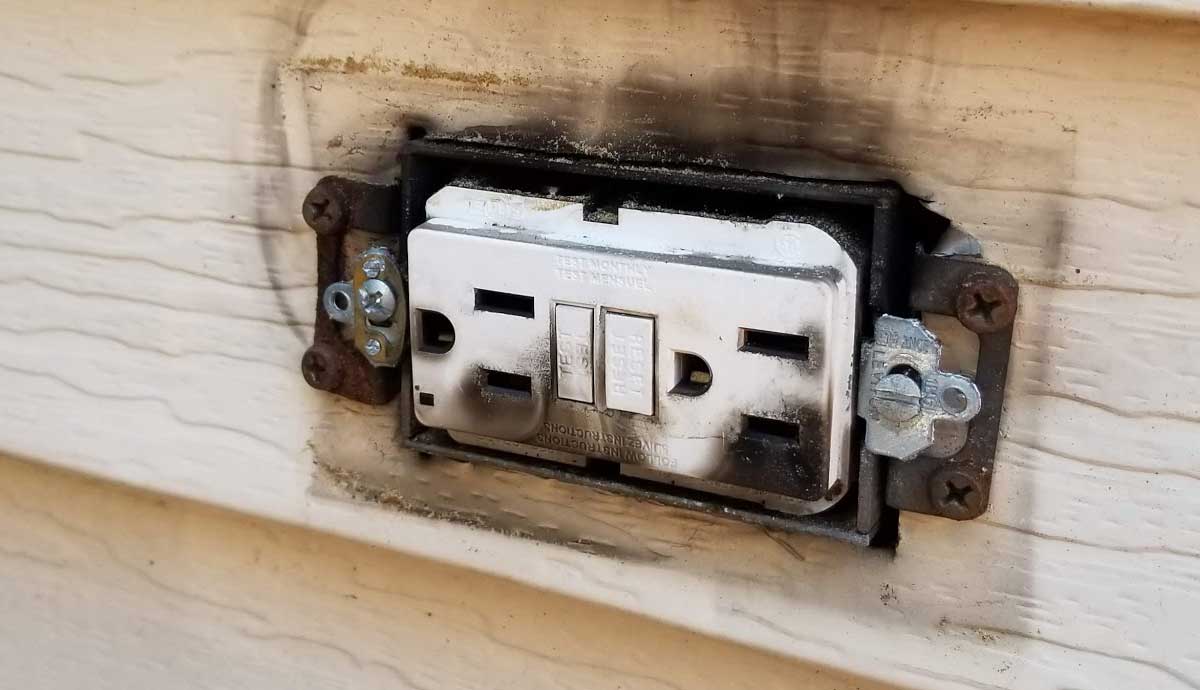
GFCI’s help keep you safe, but don’t last forever!
It is always a bit frightening to learn that something meant to make your life safer has a deadly dark side. Today’s surprise villains are GFCI protected outlets… and they are everywhere. These outlets are a mandated part of your home electrical system and are designed to keep you safe from shock. They do a great job too, as long as they are working. Unfortunately, GFCI’s can silently fail leaving your life at risk. Regular service as described here can reduce the risk of failure, but most homeowners will never know, because although GFCI’s are mandated, proper maintenance is not.
Pop-up GFCI outlet
Purpose of GFCI
GFCI stands for Ground Fault Circuit Interrupter. These are special electrical outlets in your home that stop the flow of electricity if any abnormal current flow takes place. Their purpose is to prevent a possible electric shock.
Starting in 1971, the electrical codes have required you to have GFCI outlets in your kitchen, around the backsplashes, and in each bathroom in your house. They are required in any potentially wet location. Also, any exterior outlets around your house, are required to be connected to a GFCI-protected circuit.
Types
There are two types of GFCIs. GFCI “circuit breakers” and GFCI “receptacles”. GFCI receptacles are used extensively inside the house where they are safe from weather and easier to reset. Circuit breaker types work better for protecting exterior outlets since they can be better sheltered in a service panel. The main disadvantages of GFCI circuit breakers over receptacles are cost and inconvenience (resetting). The advantage is circuit breaker types will typically outlast GFCI receptacles as they are not exposed to the rigors of the outdoors.
Most homeowners have had to “reset” a GFCI outlet at some point? You can do this by pressing the RESET button after it has tripped. GFCI’s can sometimes trip because of power surges, electrical storms, or just by overloading the circuit. The fact is, unless they have tripped, you probably don’t really think much about them. That could be a dangerous error.
How GFCI’s Work
A normal 120-volt outlet in the United States, has two vertical slots and then a round hole centered below them. The left slot is slightly larger and is the “neutral,” the right slot is the “hot”. The hole below them is called the “ground.” If an appliance is working safely, all electricity that it uses will flow from hot to neutral in exactly equal amounts.
A GFCI outlet monitors that current and if there is any imbalance in the flow, it trips the circuit. The GFCI senses any mismatch (as small as 4 milliamps,) and interrupts the circuit almost instantly (one-thirtieth of a second.) These specs are important because at around 10 milliamps, human muscles will lock up from electrical shock, making them unable to release whatever is causing the shock. Just two seconds of sustained current can cause death.
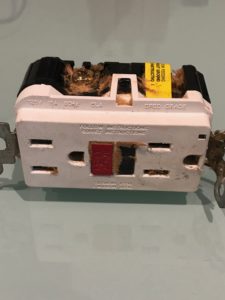
Mechanics
GFCI breakers w/blue test buttons
When the reset button is pressed, the spring-loaded contacts close, allowing current to pass. An internal solenoid connected to a sensing coil keeps the contacts closed.
The sensing coil surrounds (but is not electrically connected to) the hot and neutral conductors. In normal operation, the current moving down the hot conductor returns up the neutral conductor and the currents are equal and opposite and cancel each other out.
Any fault to ground, caused for example by a person touching a live component in the attached appliance, will cause some of the current to take a different return path, creating an imbalance in the current flow.
This imbalance causes a current in the sensor coil which then releases the spring-loaded contacts and cutting off the electricity supply to the appliance.
All this happens in milliseconds, greatly reducing the chances of a dangerous shock being received.
The test button allows the correct operation of the device to be verified. This simulates a fault by creating an imbalance in the sense coil. If the GFCI does not trip when this button is pressed, then the device must be replaced.
GFCI Outlet Service Life
GFCI outlets don’t last forever. This means that some of yours may no longer be protecting you as they should. Functional GFCI outlets likely save thousands of lives every year by preventing electrical shocks from wet hands, improper use of extension cords, touching bare exposed wires etc. But only if they are working.
The average GFCI outlet has a service life of only 10 years. If your home is older than that, there’s a good chance that at least some of your GFCI outlets aren’t working properly. If your area is subject to corrosion, high humidity and/or frequent storms or power surges, it is possible for GFCI outlets to become non-functional in 5 years or even less.
Compounding the problem, contractors and developers often buy GFCI’s in bulk which usually nets the most cheaply made units on the market. Using higher quality receptacles will give a longer life span so buy specification grade, commercial grade, or hospital grade. These are much higher quality GFCI’s for just a few dollars more.
Testing your GFCI
Failed GFCI outlet
The best way to see if your GFCI outlet is still doing its job is to test it. To do so, the outlet must be powered up. An unpowered GFCI outlet can’t be tested, and it won’t allow you to reset it until it’s powered.
The simplest way is to press the TEST button on the outlet. Doing this creates a fault to ground and interrupts the flow of electricity. This in turn pops out the spring-loaded RESET button. You can then press the RESET button to reconnect the circuit and resume normal operation. Common GFCI outlets have a red TEST button and a black RESET button, though newer outlets may look different.
Press the TEST button and if the GFCI doesn’t trip, replace it as soon as possible. If your test causes the outlet to trip but the RESET button won’t reset, that means it needs to be replaced (it probably wasn’t protecting you anyway). A GFCI outlet can’t be reset if it’s not getting power so check that the breaker isn’t tripped before deciding that the GFCI outlet is faulty.
You should test your GFCI outlets ay least quarterly. It’s extra work, but it really could save your life.
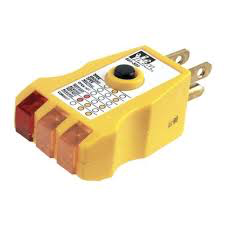
Outlet Testers
The best way to test a GFCI outlet is with a device that actually creates a ground such as this Triplett Plug-Bug:
GFCI outlet tester
I get them for my entire crew here for under $7 on Amazon. Just plug it into the outlet, press the button on the tester and see whether your GFCI outlet trips. Testers like this one have Indicator lights to show whether any outlet (GFCI or standard) is wired properly. It can identify common problems like an open ground, open neutral, open hot, or reversed wires. Sometimes an outlet will not look like a normal GFCI but the when tested the circuit will go dead. In that case you either have a GFCI breaker in the main panel, or the outlet you tested is “downstream” from another GFCI outlet located somewhere else. If so you will need to search for the breaker or outlet and reset.
Replacement Protocol
There is no way to take outlets apart to make repairs. If they are found to be defective they must be replaced. Here is the replacement protocol HPS recommends to their clients: Use a tester to check and verify GFCI operation every quartier. For the first five years replace one at a time as needed. After five years when one fails, replace them all.
I save money by buying high quality GFCI outlets in quantities. I recommend these 15A GFCI outlets by Eaton. Eaton makes great quality products but what I really like is that these GFCI outlets do a regular self-test. A blinking red LED indicator means they’ve reached the end of their service life and need to be replaced. If you don’t have HPS. or can’t remember to manually test your GFCI outlets regularly, using these self-testing versions are a good option. NOTE: Make sure when ordering to match color with your existing outlets and switches.
Safety First
Testing your own GFCI outlets is definitely something any homeowner can (and should) do. Replacing a GFCI outlet that has reached the end of its service live is something average homeowners should leave to a professional licensed electrician. If you ignore this advice, just know that with any electrical work, it’s important to follow safety procedures such as shutting off the circuit at the breaker and testing all wires in an outlet box before touching anything. This is particularly important in boxes that contain more than one outlet and/or switch. Never assume that a wire is dead. Always use an electrical circuit tester before touching anything. If you don’t have one, you can get a circuit tester in a set with a GFCI outlet tester for less than $15. These are good tools that every homeowner should have.
Summary and Recommendations
GFCI outlets wear out and fail after a few years much like smoke and CO detectors. It is highly likely that some of your GFCIs have failed or are way past their intended service life. With your own tools, you can safely test your GFCI outlets. Have a licensed electrician replace any failed outlets. Another problem to avoid is locating a master GFCI (a GFCI controlling a number of non-GFCI outlets) in a closet or some other difficult to find location. These can be time consuming and frustrating to find when tripped.
History of GFCI code changes
Various GFCI code enactments:
1971 Receptacles within 15 feet of pool walls
1971 All equipment used with storable swimming pools
1973 All outdoor receptacles
1974 Construction Sites
1975 Bathrooms, 120-volt pool lights, and fountain equipment
1978 Garages, spas, and hydro-massage tubs
1978 Outdoor receptacles above 6ft.6in. grade access exempted
1984 Replacement of non-grounding receptacles with no grounding conductor allowed, pool cover motors and distance of GFCI protection extended to 20 feet from pool walls
1987 Unfinished basements, Kitchen countertop receptacles within 6 feet of sink, Boathouses
1990 Crawlspaces (with exception for sump pumps or other dedicated equip.)
1993 Wet bar countertops within 6 feet of sink
1993 Any receptacle replaced in an area presently requiring GFCI
1996 All kitchen counters – not just those within 6 feet of sink, All exterior receptacles except dedicated de-icing tape receptacle, Unfinished accessory buildings at or below grade
1999 Exemption for dedicated equipment in crawlspace removed
Thank you for taking time to use this free website. I hope you find the junk-free information here fun and useful? Please send me your comments and feedback.
Writing and maintaining the information in this manual is a lot of hard work. By sharing these pages with your friends, you help me to continue the effort. You can easily share these pages to all your favorite social media sites via the shortcut buttons on the sidebar. You can also simply email the page link to your friends. Please share often.
The very best way to help me happens when you use the embedded links to buy things. Using a link is easy and free, yet it provides a great source of support for this site. The vendors I’ve chosen to link to have proven to be trustworthy and are the very best resources available. That is why I recommend them personally.
Do you want to link to anything on this site? Please do! Go right ahead. I appreciate it and am honored to be considered as a resource on your website. Always feel free to link to anything you find helpful. Of course, please never copy anything (everything is copyrighted and registered), but link away and thanks!
Thank you!
Copyright and permission to use information.
If you have questions or just want to say hi, please send me a note. If you are looking for help performing the work described and you are in the San Francisco area, go to HPS Palo Alto Inc.and request a free evaluation.
As a reminder, it is unlawful to make copies including cut and paste or especially in the form of making printouts for reuse. If you wish to make a print for personal use, I will happily grant you one-time permission if you will kindly send me a request in writing.
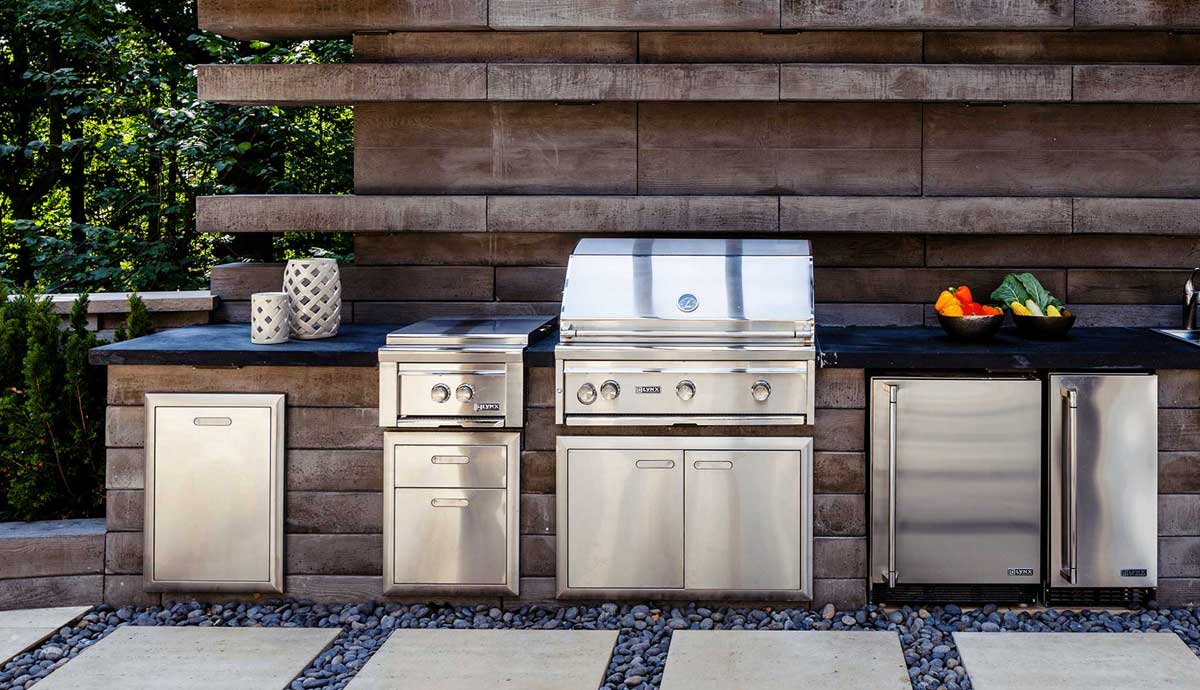
Entertaining outdoors at home is more fun and exciting than ever. And thankfully it’s not all about pools anymore! Outdoor living has become an all year activity.
Today’s back yard experience centers more around food and drink. And homeowners love kitchens. As a result, pizza ovens, elegant BBQ’s and patio heaters are now the dream features for the average back yard. Even wine and tiki bars are coming back!
Outdoor rated refrigerator
Patio cooking for family and friends has become a central event for many homeowners. And of course, good cooks demand every convenience. Disposals, dishwashers, refrigerators, ice machines, coffee makers and microwaves are needed. And since the entertaining and cooking tasks have moved outdoors. The need for outdoor-rated appliances has become important.
Harsher conditions
The outdoor environment is much harsher than indoors. And any appliances placed permanently outside are going to have to endure some bad weather. Everything from widely changing temperatures, fluctuating humidity, fog, sun, dust and wind will all attack any equipment outside. And insects and animals will certainly find your outdoor kitchen appliances to be a cozy place to raise a family. This is why every patio kitchen needs outdoor-rated appliances.
Tougher specifications
Outdoor-rated appliances have been specially designed for outdoor use and are tougher and more durable than indoor units. They are more corrosion resistant and have protected wiring and plumbing. The exteriors are sealed to keep out gnawing rodents and nesting insects. And outdoor rated equipment also has better insulation and moisture protection. Especially for the electronics. They are essentially “hardened” to the outdoor environment.
Every manufacturer has different specifications. Meaning some are tougher than others. So be sure to check them carefully before buying.
Prices
All this “hardening” comes at a cost. As a result, prices for outdoor-rated appliances are a bit higher than their indoor counterparts. Fortunately, they also appear to come with better warranties. Some are even advertised with limited lifetime guarantees. Despite the slightly higher costs, preventing a rat from living in your pizza oven or chewing up your refrigerator is affordable peace of mind.
Availability
Outdoor rated dishwasher
Specialty outdoor-rated appliances are available over the web from BBQ Guys and can be shipped to you in just a few days. Some of the appliances currently available with “outdoor” ratings include:
Cooktop burners
Ventilation hoods
Dishwashers
Refrigerators
Freezers
Ice makers
Warming drawers
Pizza ovens
Sinks and bar faucets
Wine coolers
Televisions (SunBrite and Sealoc make products in 4k up to 75 inches.
I could not locate true “outdoor-rated” small appliances like microwaves or coffee makers. But many were available in a “marine” grade. The drawback to marine grade appliances is they have different dimensions and voltages making them less suitable for home use. The point is basically moot anyway. The portability of small appliances like coffee makers, toasters, blenders etc. makes them easier to move indoors when not in use. And their low cost makes them less painful to replace if you don’t.
Summary
If you want your outdoor kitchen equipment to last longer than a week or two, you need outdoor-rated appliances. Normal appliances will not survive long outdoors, and doing so will void the manufacturer warranty. If you are putting together a quality outdoor kitchen, don’t make the mistake of using the wrong kind of appliances.
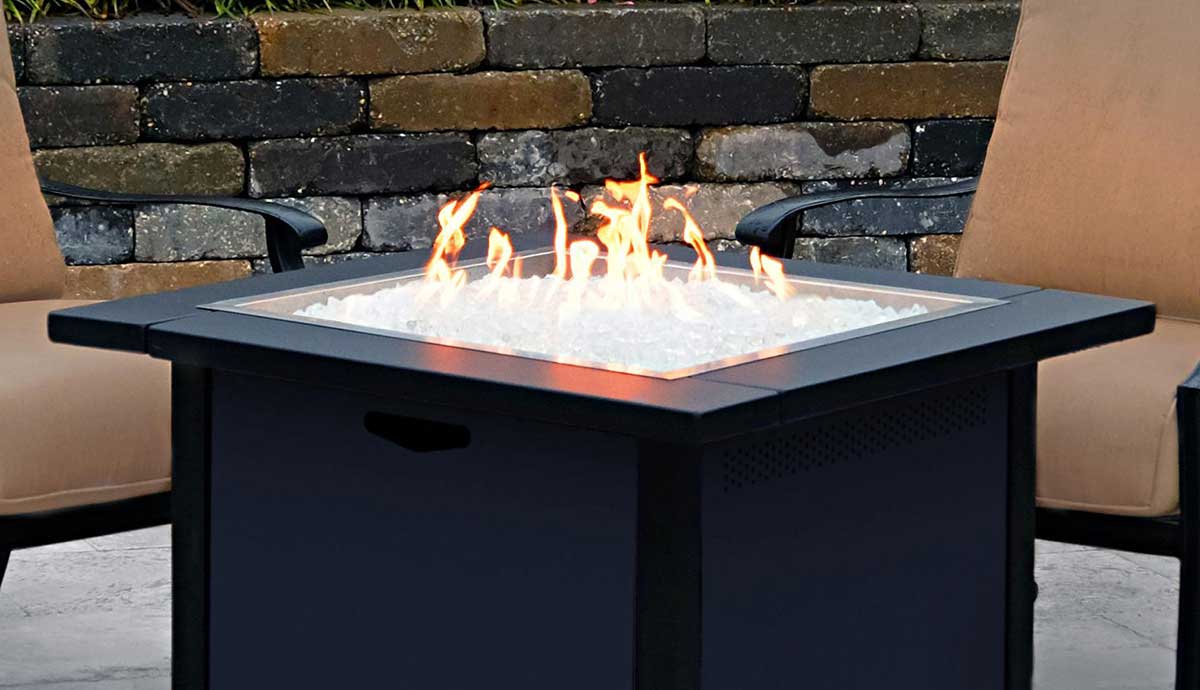
Outdoor fire pits have become extremely popular over the years. Wood or gas burning fire pits are the contemporary version of the old campfires. Fire pits are attractive design features of the “hip” patio or landscape. Fire pits are less costly or imposing compared a spa or swimming pool and almost anyone can afford one.
Gas fire pit
These are great features to retire to in the evenings for casual conversation with friends over a few glasses of wine. Most fire pits are self-contained, easy to start and safe. Some of the gas units are so easy to use they can be turned on with a remote control.
Some Service Required
As fun as these backyard features are, they are not (you guessed it) maintenance free! To help you, I have provided some important maintenance and use tips below and separated them into three sections: General, Wood Burning and Gas Burning.
Whether your pit is wood burning or gas, these are good tips to help make your time around the fire pleasant, safe and uneventful.
General Fire Pit Safety Tips
Corten steel fire pit
Only use your firepit outside in an open space with plenty of air flow. Never use your fire pit under trees, low-hanging plants, or on/near anything flammable. Do not allow your fire pit to become the cause of a wildfire.
Read the owner’s manual thoroughly so you know how to use and take care of your fire pit properly.
Learn the rules and always exceed the recommended clearance distances to combustibles.
Never use accelerants such as gasoline, lighter fluid, alcohol, or other volatile liquids to start a fire. Accelerants are very dangerous and can damage your fire pit. Spewing mouths full of rum onto the fire is dangerous and not advised, even during festive celebrations.
Never, ever use plastic materials in or around your fire pit. Melted plastic is extremely difficult to remove and will ruin the fire pit’s surface. Burning plastic also releases toxic fumes into the air.
Always keep water or a fire extinguisher close by in case of emergency.
Place a cover over your fire pit when it’s not in use. Covers prevent water, dirt, and debris from collecting inside the burning area, and will prevent unnecessary rust, freeze/thaw, wear and tear from inclement weather conditions. Allow the fire pit to cool completely before covering it. If you live in a region with harsh winters, it’s best to cover or store your fire pit in a dry, sheltered area to keep it in proper working order.
Never leave your fire pit burning while unattended. Always make sure children are supervised and kept a safe distance away from the fire at all times. Don’t allow children to play in the flames
To clean your fire pit, follow the instructions in the owner’s manual. Generally, you can use a soft cloth and mild soapy water to clean the surface and outside of the fire pit. Avoid harsh chemicals and cleaning agents, unless otherwise approved by the manufacturer.
Important Note
Fire pits are made for outdoors. Never, ever use them in enclosed spaces. Unventilated fire pits produce buildups of toxic smoke and harmful gases, like carbon monoxide that can quickly become deadly. Always use a fire pit in an open space with plenty of air flow.
Wood Burning Fire Pit Safety
Outdoor wood burning fire pit
Only use properly seasoned, dry, split wood for fuel. Do not burn trash or pressure-treated wood. Burning pressure-treated wood releases toxins and chemicals into the air that are harmful to your health and the environment.
Learn how to properly start a wood fire using tiny pieces of kindling, then small twigs with larger pieces above them. Use clean dry material and it will work great. Don’t use accelerants like gas or BBQ starter fluid. They are not safe and can even create a foul odor around your pit.
Use a screen or spark arrestor to prevent sparks and embers from flying out.
Plan for time to allow the pit to burn out. It is best to allow it to burn down and out naturally. Monitor the fire as it does but do not leave it unattended. Avoid quickly extinguishing a pit fire with water. The application of cold water can cause steam pressure and the changes in temperature can damage your fire pit. You can use sand to extinguish the flames. Sand will smother the fire without damage to your fire pit, but you will need to clean the sand out before using your fire pit again.
Allow ashes to cool overnight by spreading them out in a thin layer over the fire pit’s surface. Remove the ashes the next day using a shovel and place them into a metal bucket with a lid. Ashes can stay hot for a while, so having a metal bucket with a secure lid will prevent them from scattering around and possibly igniting a fire.
If you’re using a cooking grate to prepare food over your wood burning fire pit, always clean up properly to avoid a build-up of grease and other food residue on and around the fire pit and cooking grate. This is unsightly and will attract vermin.
Gas Burning Fire Pit Safety
Outdoor gas fire pit
Before each use, make sure there aren’t any combustible materials and flammable liquids close by.
Before each use, inspect the burner and plumbing system to make sure they are in good shape and not leaking or in disrepair.
Keep the vent openings and surrounding areas free and clear of webs, dirt and debris at all times. Bugs, dirt, and buildup can block the flow of gas and cause a fire.
For safety purposes, have the fire pit, gas supply, plumbing and any remote or chimney system inspected once a year by a licensed professional. Any maintenance needed must be done by a qualified service technician.
Don’t burn solid fuels, like leaves, sticks, wood, paper, plastic, trash, or food in a gas fueled fire pit. These items will damage the unit and the burnerand can lead to disaster.
Never cook food over a gas fire pit. Falling debris, grease and residue will permanently damage the media stones and burner, which can be difficult and expensive to replace.
Over time dirt and soot will accumulate on the burner and media. Check them regularly and follow the instructions for cleaning or housekeeping in your owner’s manual to remove any buildup. It is a good idea to be sure the fire pit has cooled completely and the gas supply is turned off before starting any cleaning process.
If there is standing water in the fire pit or the media stone material is wet, drain the water out and let it dry completely. If water gets into the gas line or burner it can constrict the flow of gas, reduce the overall flame levels and corrode the system.
Summary
Armed with these fire pit safety tips and maintenance procedures, we hope you will spend some quality time relaxing around the old fire with your friends!
Over the last year I’ve posted a number of articles on wood deck construction. If done well, wood decks can be beautiful, permanent extensions of your home’s living space connecting the outdoors. They can also become outdoor kitchen and BBQ areas. I have a special interest in wood decks because witnessing their premature failure was one inspiration for this website.
Unfortunately, many decks are built almost as afterthoughts and not designed or constructed to endure the punishing elements they will be subjected to. As a result, too many wood decks (some constructed with very dear materials) end up in the land fill before their time.
Battling the elements
The deck’s protective coating is it’s first line of defense in battling the elements. In this post I’d like to show you how to apply a finish to a new wood deck during installation. Installation is the best time to apply the first coats of finish because it is the only time you will ever have complete access to all six sides of the decking boards. You’ll only get one shot at this so take your time and do it right.
IPE
In this example we are preparing to install IPE material. I love IPE because it is absolutely gorgeous. It is also insect resistant, hard wearing and stable (very dense, few twists, knots, splits etc.). All these things of course make it very desirable and expensive. It is also a rainforest product. And even though we only use FSC certified lumber, I still feel IPE deserves special treatment and honor by only using it in the most well planned and executed applications.
IPE deckingIPE Oil
One drawback to IPE is that it will require re-coating the surface finish every 18-24 months to in order to maintain the rich color. If not recoated the surface turns a weathered gray color much like teak. Applying a good finish to begin with makes subsequent applications much easier. We use IPE Oil purchased here from Amazon. If we need to add color (this is sometimes needed for follow up applications) we can use Sikkens stain products also available here from Amazon.
Process
I’ve included a video here of the initial stain and finish process. This was a large installation so the crew set up a system to handle long pieces in high volumes. Even with all the people and infrastructure in place it is a slow process to handle and put the first coat on these boards. The process goes like this:
wipe each board clean and sand all sides and remove dust.
place in dip tank to soak for 5 minutes.
work the oil solution into the grain and grooves with brush.
wipe off the excess oil.
stack the finished boards on “finished” stickers for drying and eventual use.
Once the boards are installed, they will be sanded again and a final coat will be applied and wiped down.
Be sure to store any oily rags in a sealed, water-filled can of water to avoid a fire.
Before the finish process, these boards were pre-grooved on site. The grooves are used to accommodate the invisible Tiger Claw fastener system that attaches the planks to the structure. This hardware leaves the surface blemish free. If y0u like a surface free of fasteners, the Tiger Claw product can be had here at Amazon.
If you are reusing older boards or using brand new boards that have aged or become dirty you will need to clean them first. Do this by washing and scrubbing them with a deck cleaner material and rinse, followed by a wood brightener.
Drying
Stacking the material and allowing it to completely dry is important. This way the material can be handled easily during installation. The drying rack stickers must also be finished with IPE Oil because raw wood stickers will absorb the finish from the boards and leave permanent unattractive white lines on them. Wood decking must be sealed on all sides including the cut ends of every board. End sealing is especially important for pre-finishing a wood deck with IPE lumber.
Pre-finished deck boards on drying rackSanded deck prior to final coat
Prefinishing your deck boards will add years of life to the end product and reduce the regular maintenance time considerably. Special thanks to ProStaff Painting in San Carlos CA for their help with this project.
Do you have a wood deck project coming up? Feel free to contact me directly if you have any questions?
By far, most calls to plumbers involve clearing plumbing drains or dealing with backed-up sewers. But not all backed up drains are alike. Some are easy to resolve like simply clearing hair out of a bathroom sink trap or unclogging too many artichoke leaves stuffed down a disposal. These may only require a couple of hand tools or maybe a snake (drain auger). If your handy or tend toward DIY then it may be a good investment to keep a small hand operated plumbing snake handy. Get a good one here from Amazon.
Do not use liquid drain cleaners. I have written entire articles on this topic of liquid drain cleaners. Clogged drains require a sound mechanical clearing solution not a poisonous liquid miracle.
Unfortunately, about 30 percent of the calls are more difficult than simply clearing plumbing drains and require more work and bigger equipment.
Don’t use chemicals to clear your drains
Video cameras
Plumbing video cameraPlumbing inspection camera
When clearing a plumbing drain, if the clog cannot be resolved after several attempts with a normal snake, alternatives need to be recommended. If the clog is stubborn and the drain water is fairly clear, we may recommend a video be taken of the interior of the clogged line.
A video can usually tell what type of material may be causing the line to fail. For instance, has the line has been blocked by a collapsed or disconnected pipe? Or is something solid, like a large root or some other obstruction blocking the line? The video may provide enough visual clues to determine the next step. Even if the blockage is not visible, running a special video camera into the line will at least help determine the approximate location (distance and direction) of the clog.
Resolving the blockage
If the blockage is caused by a visible break in the line or if there is a solid root filling up the space, there will be no alternative but to dig up the line and replace it. On the other hand, if the blockage appears to be of grease, caked on dirt or some mass of smaller roots, then a Hydro-flush may be in order. A hydro-flusher is an expensive pressure washer. It consists of a high-pressure hose with an optional cutting bit attached to the end. It is then fed into the line and run through to the blockage. The high operating pressures will clear anything loose in the line and can sometimes cut through masses of smaller roots.
Unfortunately, even a hydro-flusher it will not cut out large roots. It is important to note that if roots of any size are the problem, the clearing will only be temporary. When roots are present in the line it means they have an access point somewhere. Likely a crack or an open joint in the pipe. Even if you cut them out they will be back soon. When you find roots in your system, it is best to replace the line.
When clearing clogged drains is not enough
Replacing the drain line can be done by trenching, or trenchless construction. The choice usually depends on the cost of avoiding obstacles in the way of the work. Trenchless can be a good option of the path of the line is obstructed with a lot of surface hardscape. Trenching by hand may also be required if equipment will cause damage.
Either way, a lot of work will be involved in replacing a sewer lateral from house to the street. If you have to do this work do not skimp on replacement materials or workmanship. Do the job right so you don’t have to deal with it again. Use the heaviest duty materials with well-sealed joints and the proper number of clean-outs in order to make future maintenance easy. Cut-back or block off all invasive tree roots. Backfill carefully around the new line with the proper material to achieve the required slope and avoid settling and dips along the length of the line.
This stainless steel “passivation”treatment reduces rust and corrosion and makes it look like new.
Nothing is sadder for a homeowner than to see expensive and gorgeous materials that have been left to corrode in the elements. Stainless steel finishes are a good example. Most homeowners don’t know the basics of caring for these nice finishes and if you happen to live in a corrosive environment or close to the ocean, it really really can take a toll.
Here is a process we use at HPS Palo Alto, Inc. to clean, polish and passivate exterior stainless steel architectural finishes. This is a time and labor extensive process but is quite effective at returning weathered stainless back to original glory. This treatment should also be a mandatory specification for new stainless steel products and installations. Let your designer or architect know.
Dust free absorbent cloth for drying and application of alcohol.
Warning!
Do not use this process on stainless steel sheet material with a factory machined finish. Always test first on an area that is least exposed to be sure that it meets with your aesthetic needs.
The stainless steel passivation process
Step 1
First wash and scrub the metal with regular tap water and a Scotch Brite pad. This will remove dirt, dust, bird droppings and any accumulated surface residue.
Step 2
Next vigorously scrub the entire surfaces with fresh pads along with a mix of 2 parts phosphoric acid and 10 parts distilled water. Scrub the length of the metal parts and go with the “grain” not across it. Continue to scrub and polish the metal until all rust and corrosion has been satisfactorily removed. Do this in small sections at a time in order to not miss any spots. Heavily corroded and hard to access areas may need to be done several times.
Step 3
During the first step, apply Wichinox paste to any welds in the work area while the acid mix is still wet on the metal. The welds are the worst areas and the paste help to give the phosphoric acid longer to work its magic. Rinse off the acid mix from the rest of the work but leave the weld areas with paste for at least 15 minutes before rinsing.
Step 4
Mix baking soda and distilled water together in a ratio of about a box of soda to 5 gallons of water. Carefully wash all surfaces of the metal with the baking soda/water mix. This will completely neutralize any of the acid that may be left from the previous step. Scrub the welds if necessary with this mix using a clean toothbrush to remove all the paste. Rinse with a fresh batch of distilled water when done and allow to air dry.
Step 5
Wipe all metal surfaces with denatured alcohol and let dry. This removes all residue from prior steps including fingerprints, dust, oils, grease etc. and leaves the surface clean and ready for the sealer.
Step 6
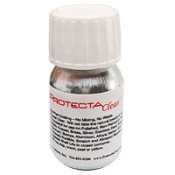
When the surface is completely dry from the above step, and the appearance of the metal surface is completely satisfactory, then apply two coats of Everbrite Protectaclear sealer waiting 1 hour between coats.
Note:
The sealer is a wafer thin molecular protectant and it is completely invisible. It will last in harsh conditions and direct sun for about 2 years and keep the steel looking new and shiny. After two years the sealer will begin to break down and the steel will again be exposed and vulnerable to corrosion. The manufacturer recommends that the metal be washed again and a new coat of sealer applied every year. This way the bare steel is never again exposed to corrosion. The wash and re-coating process is much faster than the initial treatment.
Summary
If you like your expensive metal trim looking like new, this is the only reliable and lasting way to accomplish it.
Your dryer duct is probably not something that you think much about. And really you shouldn’t have to as it is permanently built into your home. Unfortunately, clogged dyer ducts are the reason for a large percentage of dryer failures, malfunctions and warranty calls. This happens because your dryer duct needs regular maintenance and is likely not getting any. Most homeowners either don’t know how or the duct has not been installed to allow proper service.
Here’s how the dryer duct works. Your dryer extracts moisture from your clothes during the drying process and pushes this moisture out of the dryer through the duct to the exterior. As this warm moist air passes through the duct, condensation will occur as it makes contact with the cold metal duct walls. See more about washers and dryers here.
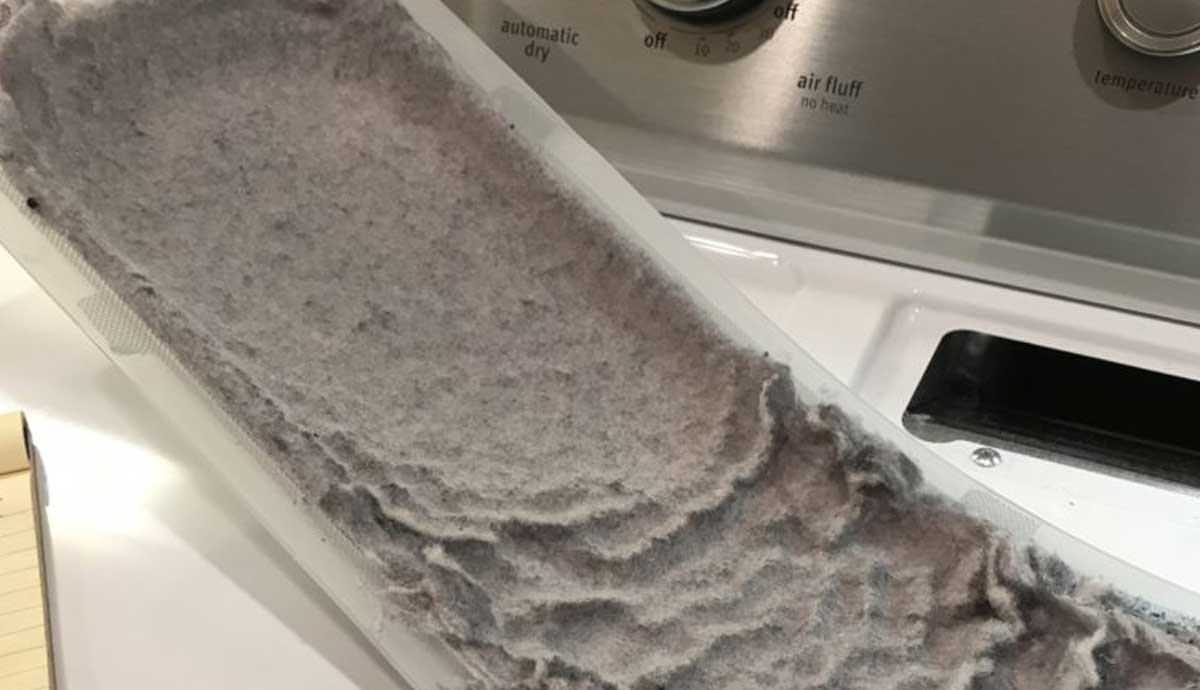
If there are lint particles in the moist air, they will stick to and slowly build up on the inside of the moist duct walls. The lint screen in your dryer is designed to keep this lint out of the air stream. That is why it is so important to keep the lint screen clean and from getting damaged or clogged.
Poorly maintained dryer lint screen
Even with proper cleaning of the lint screen, over the course of a year or so enough minute lint particles and dust will build up inside the duct to require service. The maintenance process includes pulling out the dryer, disconnecting the flexible duct connector hose, and then running a brush through the solid dyer duct all the way to the exterior of the home. This removes the lint from the duct walls and clears any blockages allowing the air to flow free again.
Proper ducting material
Proper built-in dyer ducting is made of smooth rigid metal, sealed air tight at all joints and with gentle curves at any bends. This is so cleaning brushes can slide through easily.
Flexible ducting used for this purpose is a code violation. Flex duct is not to be used for any built-in dryer vent ducting except for the final connection to the appliance. Code allows the total dryer ducts to be no longer than 14′ with two elbows. For vent lengths exceeding 14′ and 2 elbows, a dryer booster fan should be added.
At HPS we occasionally see cheap flexible ducting installed, especially in “flipped” homes. When we see it we recommend immediate replacement so that the duct can be properly maintained down the road. If you have flex in your home, you should replace it with rigid. Your local HVAC contractor can do this for you.
We sometimes also see dryer ducts that terminate in the attic or crawlspace. This is a code violation and it allows moisture and lint to a accumulate in those areas. Elevated moisture and humidity is exactly what mold loves and an open duct is always a nice place for rodents to take up residence. More than once we have found dead rodents in the dyer duct. This is not a good way to have fresh smelling clothes coming from your dryer.
Flexible ducting is NOT for dryersDryer duct cleaning kit
Cleaning
Be sure to follow a regular service schedule so you don’t forget to do this. Download yourmonthly maintenance checklistfor this month. Removing the dryer from its location is probably the hardest part of this exercise. Be careful not to damage the floor during the move.
Once out, you can clean the space behind and recover all those lost socks that went missing over the year. Use a flexible brush kit to thoroughly clean the entire length of the duct system from the dryer connection all the way to the termination on the exterior. You can use these brushes with or without a handheld drill. I recommend using the drill combined with a vacuum as shown in the video below. You can make a transition fitting like the one shown in the video for the vacuum and brush to work together from an ABS-Y fitting. Get the brush kit at Amazon here:
Check out this video on how to clean your dryer duct:
Summary
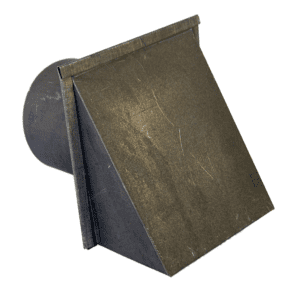
Inspect and make sure you have rigid ducting for your dryer, and have it cleaned at least once per year. Make sure you clean the dryer lint screen after every use of the appliance. Inspect the termination at the exterior and make sure the flapper closes securely and there are no shrubs touching. Rodents can use them as ladders into your dryer. Your dryer duct termination should look something like the one below and its should have a damper flap on the inside. Get one here from Amazon.
Dryer exterior wall termination
www.homepreservationmanual.com is the place to visit if you want information on: maintaining your home; how to improve air quality; ways to improvethe real valueof your home; what are the best housekeeping services; the problems with handymen services; how to plan and execute home renovation and home improvement projects; tips for spring cleaning; tidying up a messy house; and generally how to be a better homeowner.
Thank you for taking time to use this free website. I hope you find the junk-free information here fun and useful? Please send me your comments and feedback.
Writing and maintaining the information in this manual is a lot of hard work. By sharing these pages with your friends, you help me to continue the effort. You can easily share these pages to all your favorite social media sites via the shortcut buttons on the sidebar. You can also simply email the page link to your friends. Please share often.
The very best way to help me happens when you use the embedded links to buy things. Using a link is easy and free, yet it provides a great source of support for this site. The vendors I've chosen to link to have proven to be trustworthy and are the very best resources available. That is why I recommend them personally.
Do you want to link to anything on this site? Please do! Go right ahead. I appreciate it and am honored to be considered as a resource on your website. Always feel free to link to anything you find helpful. Of course, please never copy anything (everything is copyrighted and registered), but link away and thanks!
Thank you!
Copyright and permission to use information.
If you have questions or just want to say hi, please send me a note. If you are looking for help performing the work described and you are in the San Francisco area, go to HPS Palo Alto Inc.and request a free evaluation.
As a reminder, it is unlawful to make copies including cut and paste or especially in the form of making printouts for reuse. If you wish to make a print for personal use, I will happily grant you one-time permission if you will kindly send me a request in writing.